How to Give Idarity Access to Your Meta Ad Account

How to Give Idarity Access to Your Meta Ad Account#
This is the setup we send every new advertising client. It's 10 steps and takes about ten minutes.
A few items on security:
Keep your password safe.
We don't need it. You'll create a business portfolio, then create an ad account inside it, and then add us as a partner with permission to work on that ad account.
We never ask for direct access to your personal account, and you stay in control of what we can reach.
This way our ad account, Page, pixel, audiences and conversion data stay yours permanently. So does your spend history and everything the campaigns learn along the way.
If we ever stop working together, you can easily remove our access.
Any other setup means somebody else is holding your data.
Beware of phishing messages.
As soon as you open a new ads account, bad actors will send you phishing messages (inside your ads account) that look like they are coming from facebook.
The messages will say something like: "Your account is disabled due to improper configuration. If you think this is an error, please request a review of your account here."
Ignore/Delete these messages and do not click any link or fill out any form. This is an attempt to gather all of your account and login info and take over your account.
What you need before you start#
- A personal Facebook account. Meta requires a personal profile to administer a business and there's no way around it. Nothing you do in the ad account posts to your personal profile.
- Your business Facebook Page. If you don't have one, create it first at facebook.com/pages/create. Add a few photos from your website while you're there.
- A company credit card. Dedicate one card to the business if you can. Facebook often creates a lot of small charges in a row rather than one monthly bill, which is their way of confirming you can cover the spend.
- Your legal business name and address as they appear on your tax filings.
Step 1. Open Meta Business settings#
Go to business.facebook.com and sign in with your personal Facebook account.
If you've never set up a business portfolio, Meta prompts you to create one. If you already have one, you'll land in Business Suite and can skip to Step 3.
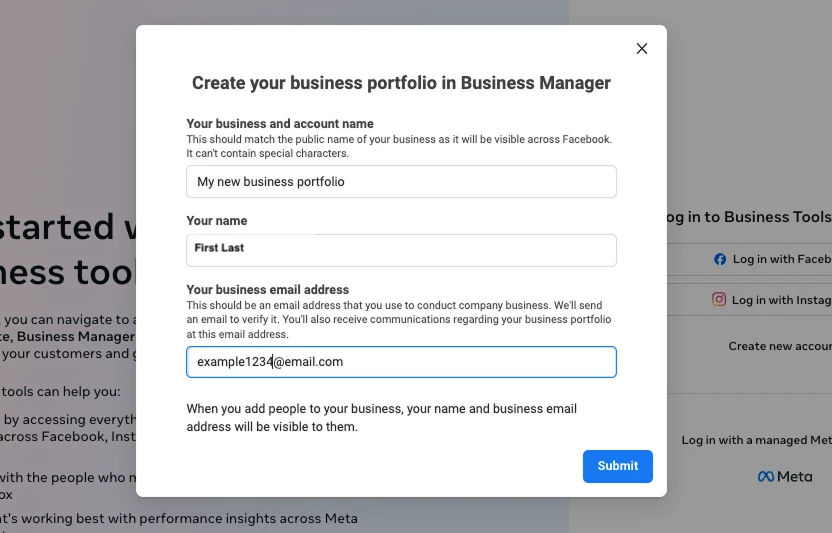
Step 2. Create your business portfolio#
Click Create a business portfolio and fill in three fields.
Business name. Use your legal business name, exactly as filed. Meta checks this against your Page and your payment details, and a mismatch will put you in a verification hold.
Your name. Your real name, the one on your personal profile.
Business email. Use an address on your company domain rather than a personal Gmail.
Confirm the verification email before you continue.
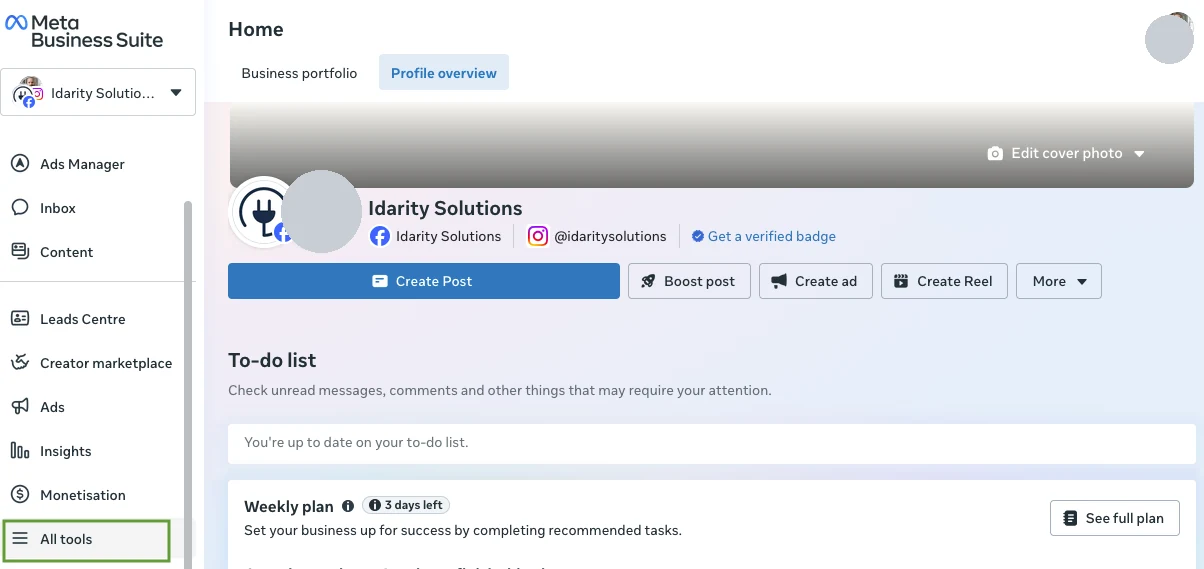
Step 3. Go to Business settings#
From Business Suite, open the left sidebar, scroll to the bottom, and click All tools.
Then click Business settings. It shows up in the recommended cards at the top, and again further down under Manage your account.
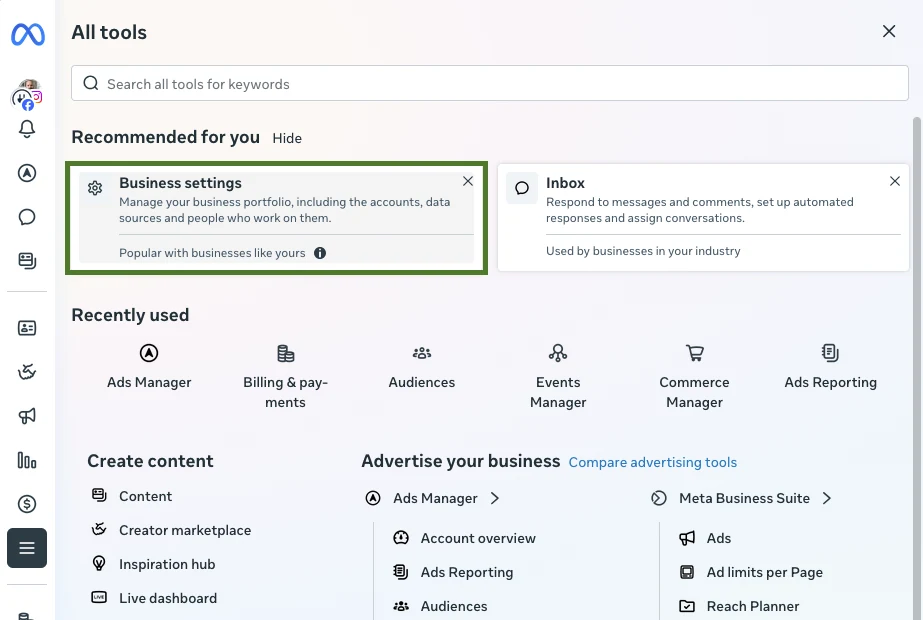
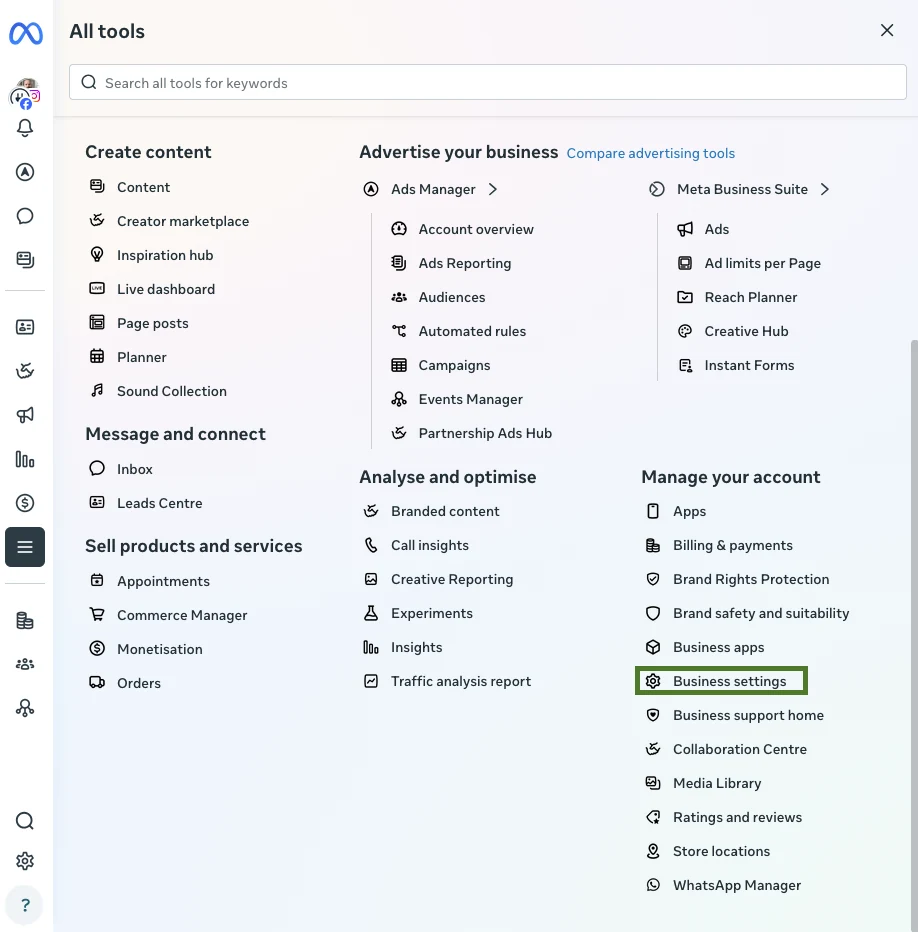
You can also go straight to business.facebook.com/settings.
Everything else in this guide happens in Business settings. Business Suite is the day to day dashboard. Business settings is where ownership and permissions live.
Step 4. Add your Facebook Page#
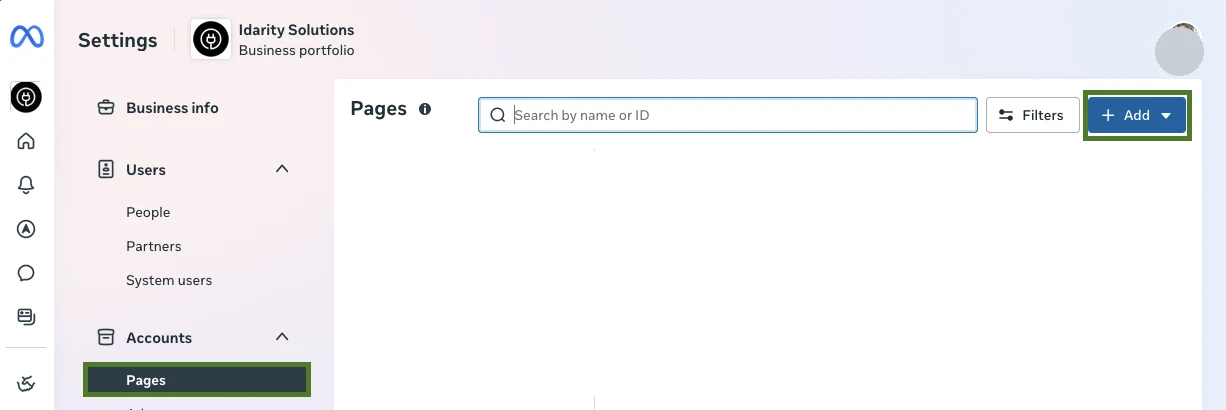
In the left menu go to Accounts → Pages, then click Add.
You'll see three options and the right one depends on who owns the Page today.
Add a Page brings a Page you already own into your portfolio. Request access to a Page is for when somebody else owns it. Create a new Page is only if you don't have one at all.
Pick Add a Page and select your business Page.
Step 5. Create the ad account#
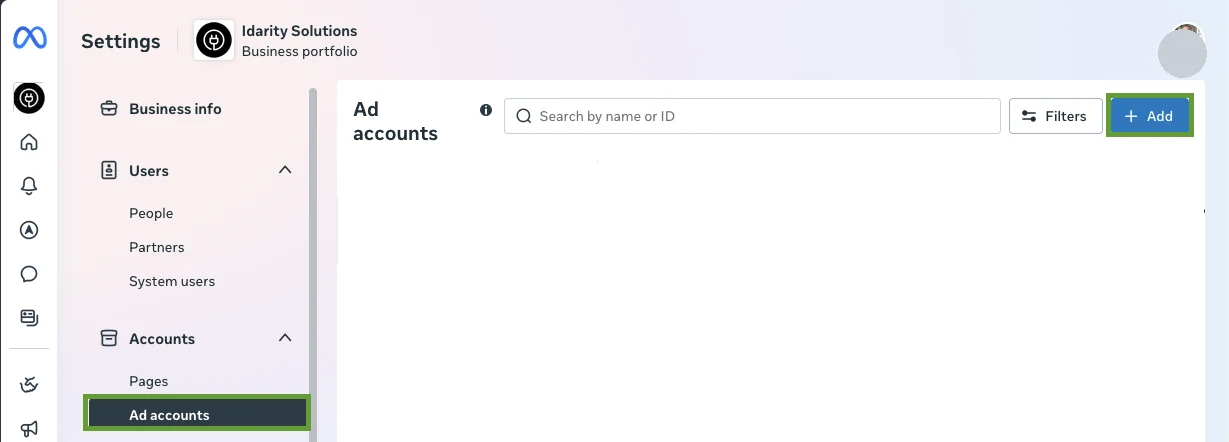
Go to Accounts → Ad accounts and click Add.
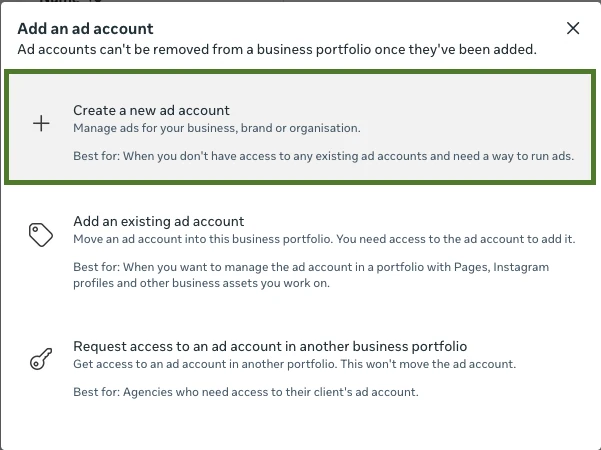
Choose Create a new ad account. Note the warning at the top of this dialog. Ad accounts can't be removed from a business portfolio once they've been added, so make sure to choose the appropriate account (you probably only have one account unless you've done this before.)
Then fill in the details.
Ad account name. Your business name works fine.
Time zone. Set it to the time zone you actually operate in. This affects your metric reports and can't be changed after creation.
Currency. USD for US businesses.
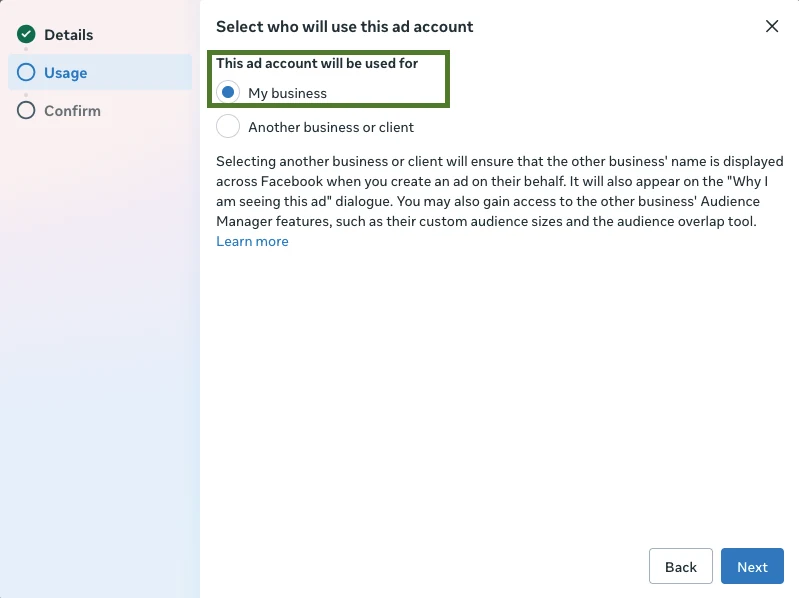
On the next screen Meta asks who the account is for. Choose My business. The other option is for agencies creating accounts on a client's behalf, which we're avoiding so you keep all your data.
Step 6. Add a payment method#
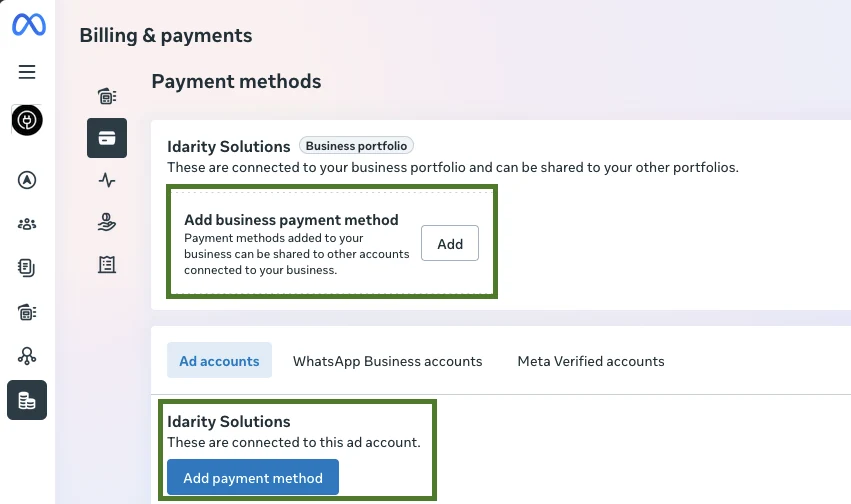
Go to Billing and payments → Payment settings, then Add payment method.
Add your company card and set it as primary. You keep control of billing permanently. We never see your card, and we can't change your payment method or your spending limits.
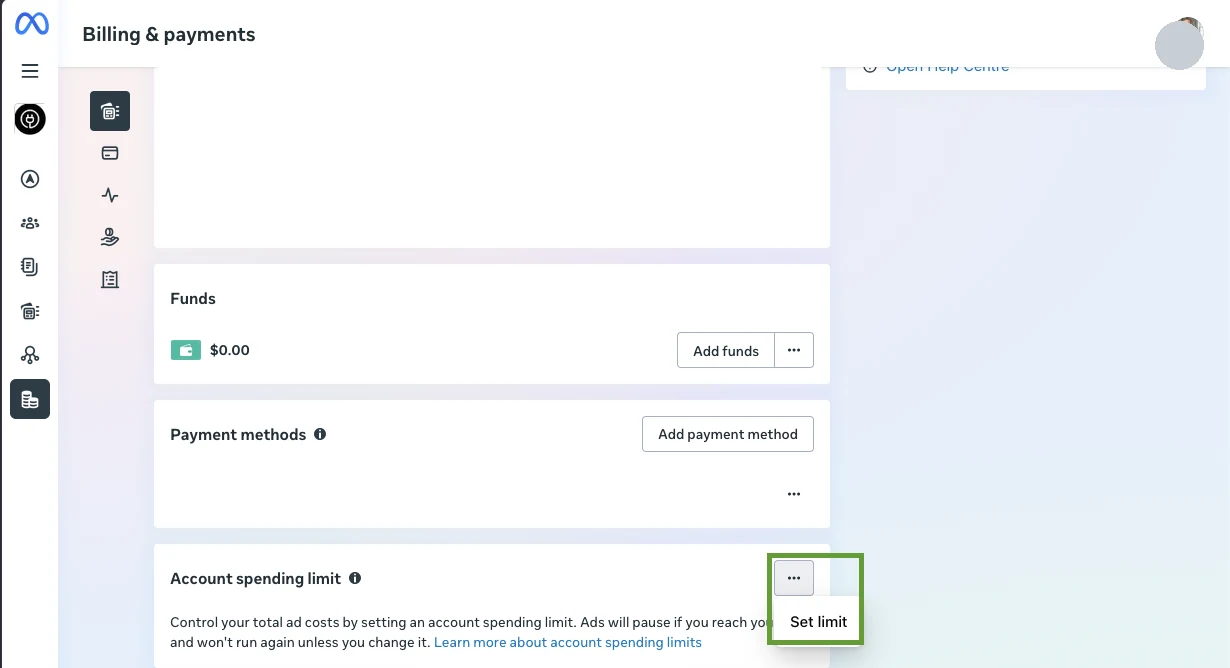
If you want a hard ceiling, set an account spending limit. Meta stops delivery when it's reached. It's a useful guardrail on a first campaign.
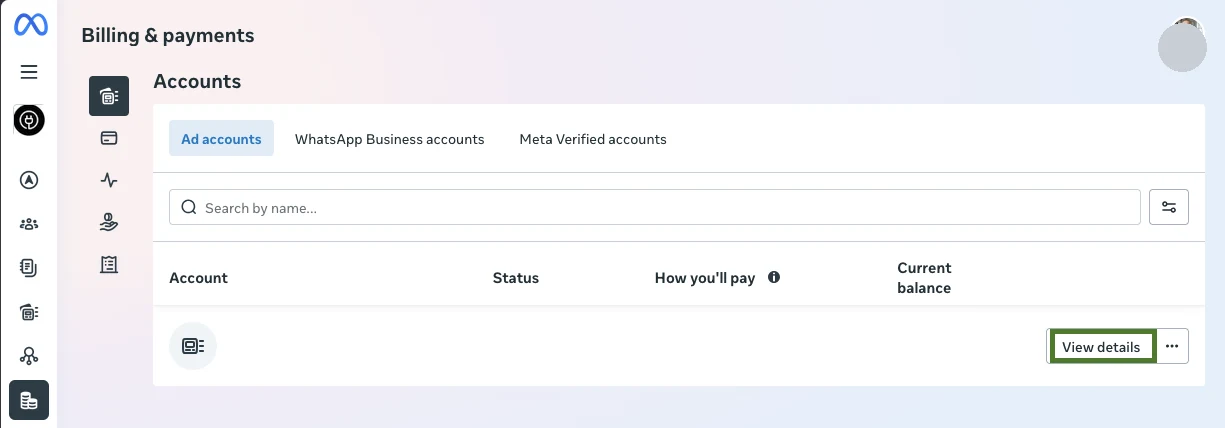
To find it, click View details on the ad account.
Scroll down to Account spending limit, click the three dots, then Set limit.
Step 7. Create your dataset#
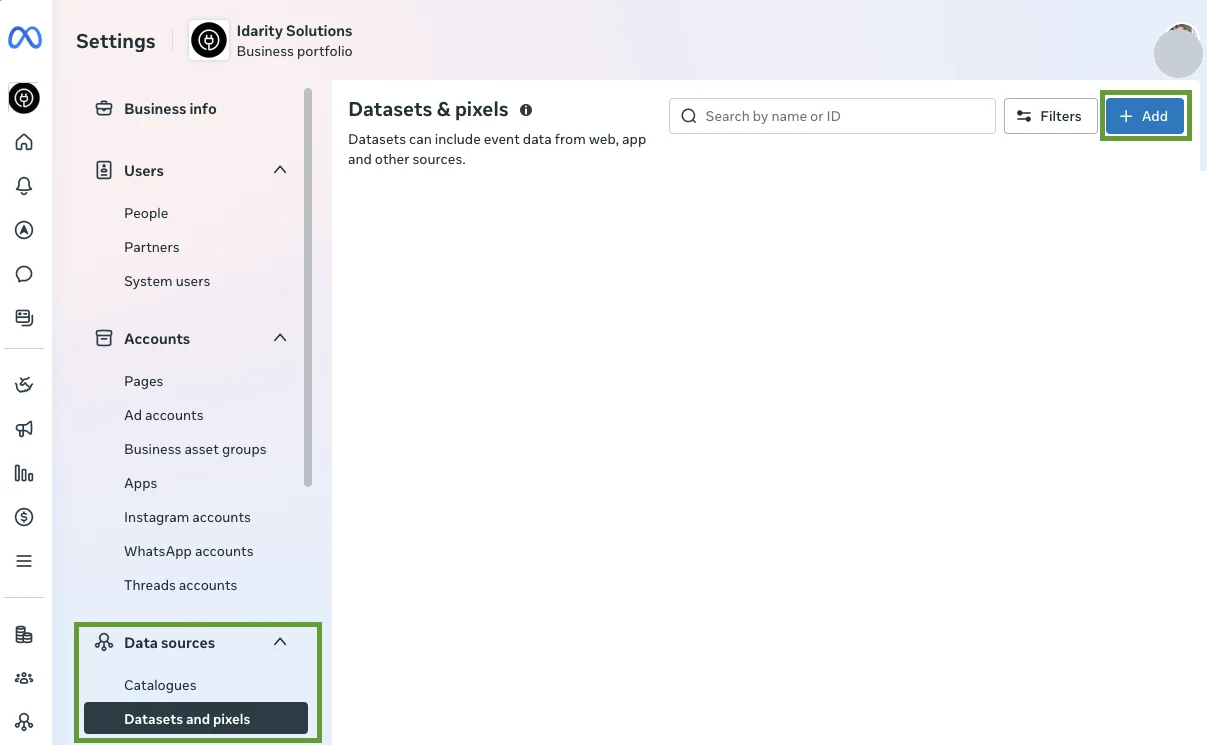
Go back to Business settings → Data sources → Datasets and pixels and click Add. Name it after your business. Leave Applicable categories empty.
The dataset is what Meta now calls the pixel. It's what tracks form submissions and conversions on your landing pages.
Without it, campaigns can only optimize toward clicks. With it, they optimize toward booked calls. That difference is worth more than any targeting decision you'll make.
Create it now even if the tracking code isn't installed yet. We handle the installation.
Step 8. Add us as a partner#
This step is the one that grants us access.
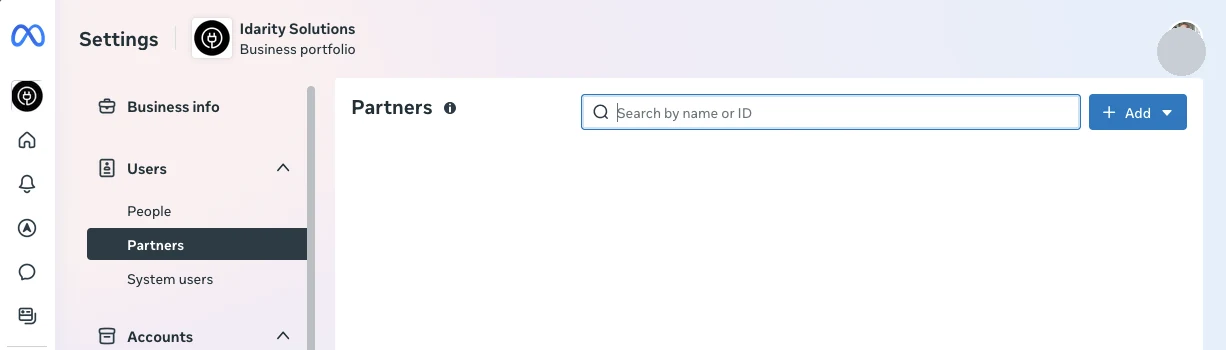
Go to Users → Partners, then click Add → Give a partner access to your assets.
Meta asks for the partner's business portfolio ID. Enter the ID we sent you. It's a fifteen or sixteen digit number.
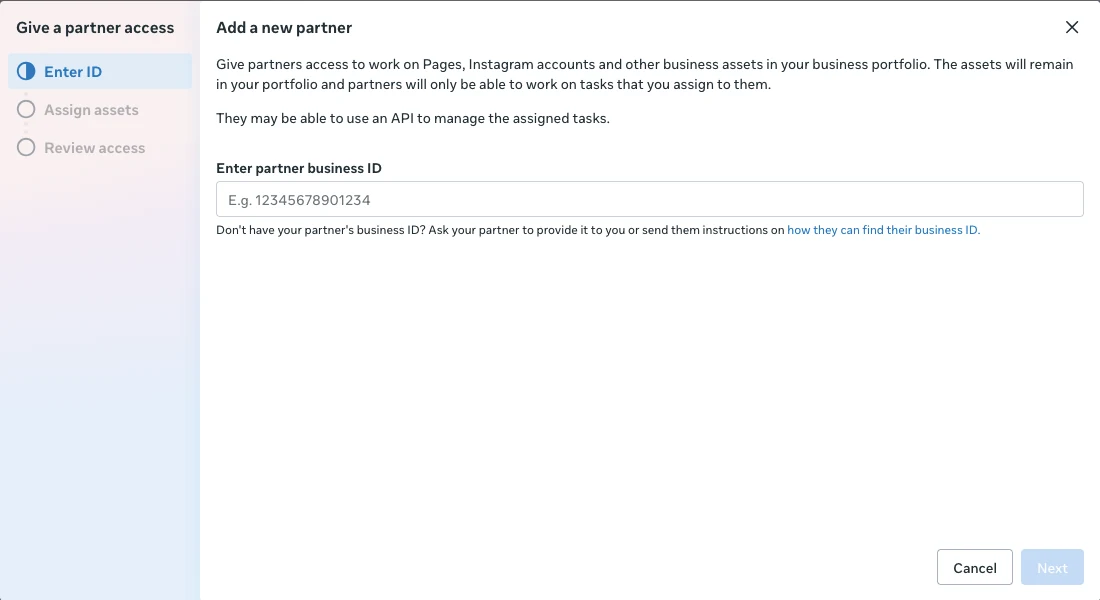
Don't use the "Add people" flow and invite an individual email address instead. Partner access is business to business. It survives staff changes on both sides, it's easier to audit, and you revoke it in one click. Individual access has to be untangled person by person.
Step 9. Assign the assets and permissions#
After you enter the partner ID, Meta walks you through choosing what we can touch. Assign these four.
| Asset | Permission to grant | Why |
|---|---|---|
| Ad account | Manage ad account (full control) | Build, launch, edit and optimize campaigns |
| Page | Manage Page, or Create ads and content | Ads run from your Page identity |
| Dataset / pixel | Manage dataset | Set up and verify conversion tracking |
| Catalog (only if you have one) | Manage catalog | Product or service catalog ads |
We ask for full ad account access rather than the lower "Advertise only" role.
The reduced "Advertise only" role blocks audience creation and conversion setup, which we need to optimize your campagins.
Do not give us access to: Your personal profile. Your billing details. Your customer lists. Your other business assets. Any Page or account you don't explicitly assign.
Partner access reaches only what you tick here and nothing else.
Step 10. Confirm and tell us#
Click through to finish. The partner shows up immediately under Users → Partners.
Send us a note when it's done. We'll confirm from our side within a business day.
If something goes wrong#
"You need to be an admin of this business portfolio." You're signed in as a different personal profile than the one that created the portfolio. Check the account switcher at the top right.
The Page won't add. Somebody else holds admin on it, often a former employee or a previous marketing vendor. Use Request access to a Page instead. The current admin gets a notification and has to approve it. If nobody has admin any more you'll need Meta support to recover it, which takes time, so start this one early.
Business verification is requested. Meta sometimes asks for documentation before releasing full ad functionality, especially on new portfolios. Have your business registration or a utility bill in the business name ready. The names have to match exactly.
Ads say "account disabled" right after setup. Almost always the payment method. Occasionally an automated policy flag on a brand new account. Check Billing and payments first, then Account Quality.
You can't find "Partners." Meta renames and reorganizes these menus regularly. Look for Users, then anything labeled Partners, Agencies, or Partner access. If the layout has moved since we wrote this, send us a screenshot and we'll point at the right button.
Revoking access later#
Users → Partners → select the partner → Remove.
One click, any time, no notice required. Access ends immediately and every campaign, audience, dataset and piece of performance history stays in your account.